The Sunny 16 Rule Explained for Film Photography
Quick Summary
The Sunny 16 Rule is one of the most well-known methods for estimating exposure without needing a light meter. It’s a simple, tried-and-true technique that can help you get properly exposed shots in bright daylight.
In this guide, I break down exactly what the Sunny 16 Rule is, how to apply it, and the considerations you need to keep in mind.
When you’re starting out with film photography, especially if you’re working with older cameras that may not have reliable light meters, understanding the basics of exposure is crucial.
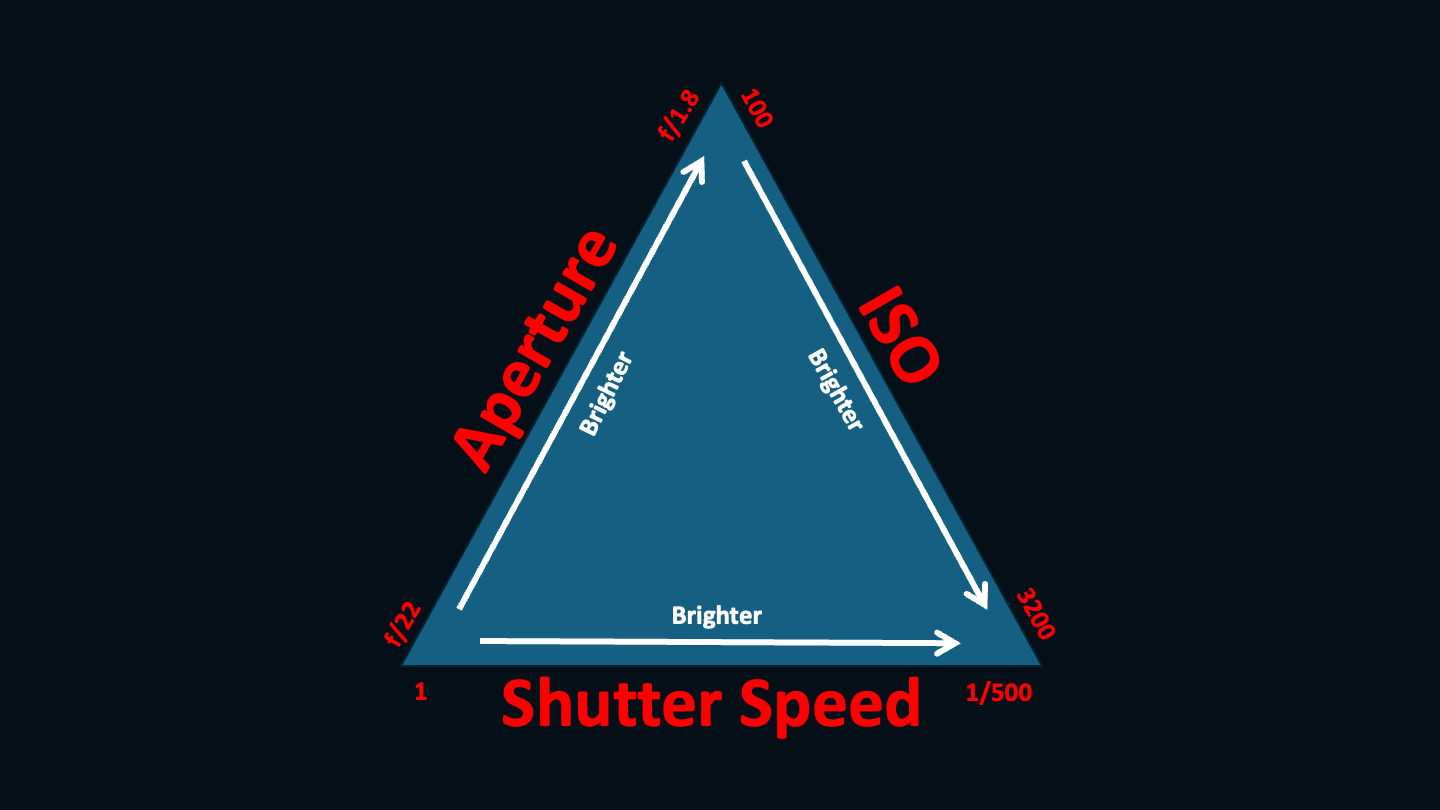
If you haven’t already, check out my guide to the exposure triangle first – this breaks down each element of exposure and will help you get to grips with necessary terminology.

Key Takeaways:
- The Sunny 16 Rule dictates that you set your aperture to f/16 on a clear sunny day and set your shutter speed to the reciprocal of your ISO
- This is great for shooting without a light meter or app or when shooting in stable conditions
- You can adjust your aperture to reflect changes to conditions and continue to use the rule (such as f/8 for cloudy conditions)
- There are considerations you need to be aware of such as being aware of shadow and contrast, and it is always good to track your metadata so you can learn from what does and doesn’t work.
- Learning the elements of the exposure triangle will help you greatly in understanding Sunny 16.
What Is the Sunny 16 Rule?
The Sunny 16 Rule is a simple exposure rule of thumb that works best under bright, sunny conditions. It allows you to correctly expose your shots by adjusting your settings without needing to rely on a light meter.
The rule is based on the idea that, in direct sunlight, you can set your aperture to f/16 and your shutter speed as the reciprocal of your film’s ISO.
For example, if you’re shooting with ISO 200 film like Kodak Gold 200, your shutter speed would be 1/200 (or as close to that as your camera allows).
Likewise, if you’re using ISO 400 film, your shutter speed would be 1/400. With these settings, you should get a properly exposed image in clear, sunny conditions.
It’s a fantastic fallback technique that all film photographers should know, especially for situations where your camera’s light meter may not be working, or you simply want a quick, reliable way to set your exposure.
I tend to use this most when shooting street photography on a fully manual camera. This is because I want to be able to shoot spontaneous subjects and events as they unfold before me, and simply wouldn’t have time to meter for these and still get chance to take the shot.

The Sunny 16 Rule in Practice
To break it down:
- Aperture: Set your aperture to f/16 when in clear sunny conditions or the corresponding value to the conditions you are in.
- Shutter Speed: Set your shutter speed to the reciprocal of your ISO, or closest your camera settings allow. For example:
ISO 100 → Shutter speed: 1/100 (or nearest depending on your camera)
ISO 200 → Shutter speed: 1/200 (or nearest depending on your camera)
ISO 400 → Shutter speed: 1/400 (or nearest depending on your camera)
Adjusting for Other Conditions
The Sunny 16 Rule can be modified for different lighting conditions by adjusting the aperture.
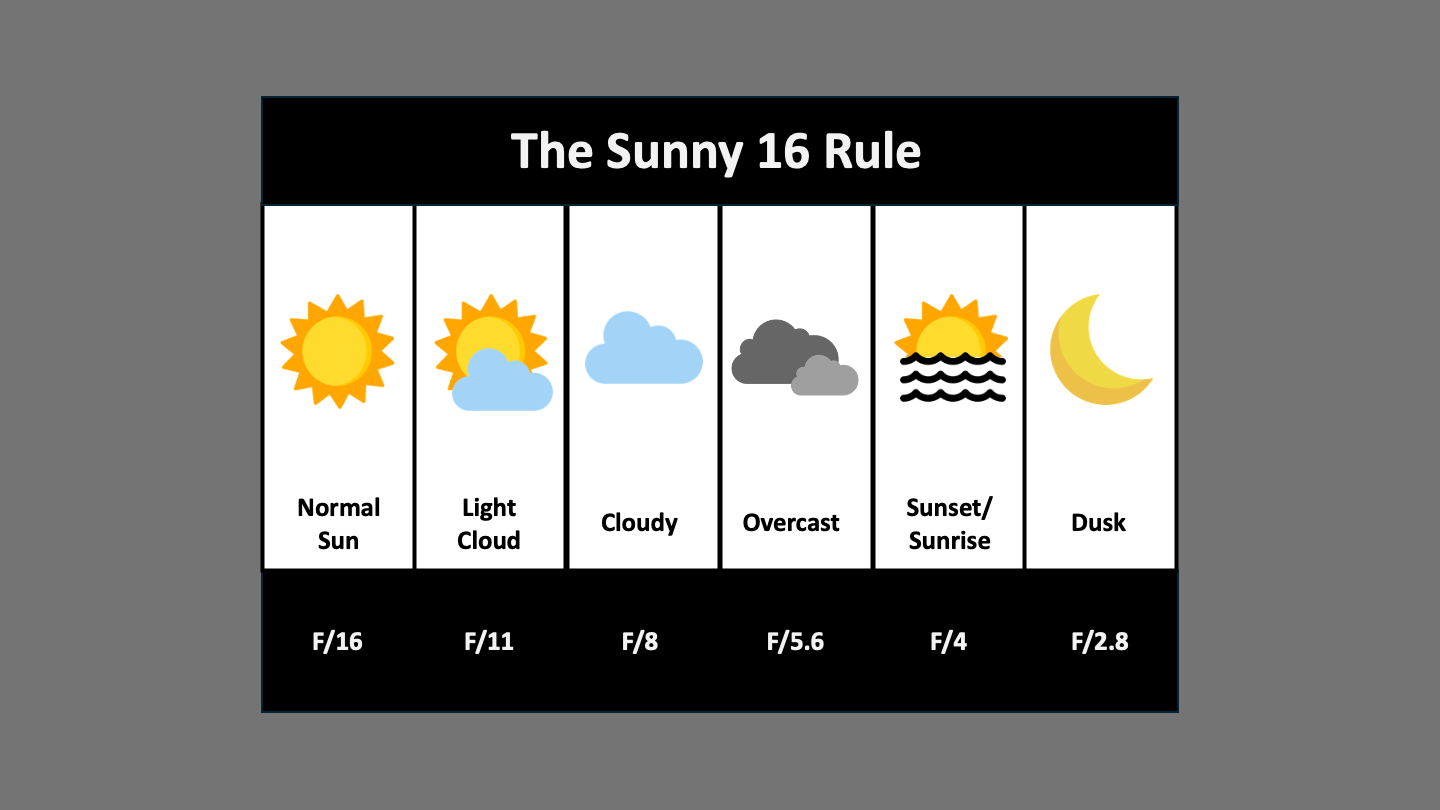
Here are some common adjustments:
- f/16: Direct sunlight
- f/11: Slightly cloudy but still bright
- f/8: Overcast
- f/5.6: Heavy cloud cover or open shade
- f/4: Sunrise or sunset
Remember that changing your aperture will also change your depth of field. A smaller aperture (e.g., f/16) gives you a deeper depth of field, where more of the scene will be in focus, while a larger aperture (e.g., f/4) creates a shallower depth of field, which is great for isolating your subject.
This is covered in more detailed in my guide to the exposure triangle.
How to Change Your Settings on a Film Camera
When applying the Sunny 16 Rule, you’ll be adjusting two key settings: aperture and shutter speed. The process may vary slightly depending on your camera, but here’s the general workflow:
- Aperture: On most cameras, you can adjust your aperture via a ring on the lens itself. Turn the ring to the correct f-stop (e.g., f/16 for bright sunlight, f/8 for overcast).
- Shutter Speed: This is typically adjusted via a dial on the top or side of your camera. Set it to the reciprocal of your ISO (e.g., ISO 100 = 1/100 shutter speed).
- ISO: The ISO is dictated by the film you’re using. It’s important to remember that film ISO is fixed, unlike digital cameras, so once you’ve chosen your roll of film, you’ll be working with that ISO for the entire roll. Be mindful of this when planning your shoot and choosing your film stock.
In practice, if you’re shooting on a sunny day with ISO 100 film, you would set your aperture to f/16 and adjust the shutter speed to 1/100. If it becomes a bit cloudy, you would drop the aperture to f/11 or even f/8 and adjust accordingly.
Considerations and Nuances of the Sunny 16 Rule
While the Sunny 16 Rule is a great quick reference, it’s not without its limitations. Here are some important considerations to keep in mind when using the rule:
1. Stable Conditions Required
The rule assumes consistent, stable lighting conditions. If you’re shooting in a setting where clouds are constantly moving, or there are harsh shadows cast by buildings, trees, or other structures, the Sunny 16 Rule may not give you accurate exposures.
In such cases, you may need to use a light meter app to ensure the correct exposure or adjust your settings on the fly to accommodate changes in lighting.

2. Watch for Shadows
If your subject is in shadow or partially shaded, the Sunny 16 Rule will not be accurate. For example, if you’re shooting a scene where your subject is standing under the shadow of a tree, or you’re photographing in a narrow alley where parts of the scene are shaded, you’ll need to adjust the settings to compensate for the lower light levels.
I had trouble with this in London this summer – although it was beautifully sunny, the high buildings were casting long shadows on the street and causing havoc with my exposures.
This is why it’s crucial to evaluate the scene carefully before relying solely on the Sunny 16 Rule. Shadows can trick your exposure, so be prepared to adjust as needed.
3. Depth of Field and Creative Choices
Changing the aperture doesn’t just affect exposure, but also the depth of field. A higher f-stop (like f/16) will give you a greater depth of field, meaning more of the image will be in focus from foreground to background. This is great for landscapes, but less desirable if you’re going for a portrait with a beautifully blurred background.
So, while the Sunny 16 Rule is helpful for getting your exposure right, remember that your creative choices matter too. You might prefer to open the aperture wider for artistic reasons, and when you do, make sure to adjust your shutter speed accordingly.
4. Log Your Metadata by Hand
Unlike digital photography, film doesn’t record any metadata about your settings. That’s why it’s useful to carry a small notebook or use an app to log your settings for each shot. Record details like your aperture, shutter speed, film stock, and conditions, so that when you get your film developed, you can learn from any mistakes or successes.
This process helps you refine your technique over time, and it’s especially helpful when you’re relying on the Sunny 16 Rule and need to fine-tune based on your results.
Here is my dedicated guide to creating a film photography log book!

When the Sunny 16 Rule Isn’t Ideal
While the Sunny 16 Rule is a fantastic tool for sunny, predictable conditions, there are many situations where it may fall short:
- Low-light or indoor shooting: When you’re shooting in low light, the Sunny 16 Rule isn’t going to work well. You’ll need a light meter to help you get the correct exposure, as manual adjustments based on visual estimation won’t be accurate enough.
- Highly variable lighting conditions: If you’re shooting a scene with quickly changing light, such as during golden hour or when clouds are rapidly moving, the Sunny 16 Rule can be too rigid. In these cases, a light meter can save you from constant adjustment.
- High-contrast scenes: Scenes with a lot of contrast (like shooting into the sun or scenes with both bright highlights and deep shadows) will also require a more careful approach than the Sunny 16 Rule offers. Here, spot metering or more advanced light metering techniques are necessary.
For those situations, I highly recommend using a dedicated light meter or a reliable light metering app.

It’s going to take some time to get used to it…
The Sunny 16 Rule is a simple and effective way to estimate exposure without relying on a light meter, especially in bright, sunny conditions. It’s a great rule to have in your back pocket as a film photographer, particularly if you enjoy shooting with vintage cameras or in situations where you may not have access to modern metering technology.
That said, it’s important to recognise its limitations and be prepared to adapt when necessary. By understanding the nuances and practising with different settings, you’ll be able to shoot confidently and make the most of this classic exposure rule.
Fred Ostrovskis-Wilkes
I am a photographer, writer and design agency founder based in Sheffield, UK.
