5 Essentials Every Film Photography Beginner Should Know
Quick Summary
If you’re new to the world of film, it’s easy to feel lost in a sea of information. I distinctly remember feeling incredibly overwhelmed when I got my first analogue camera and started to try and figure out what I needed to know to get out there and shooting some film.
This is my attempt to make that easy for you – In this guide, I am going to break down five essential things every film photography beginner should know.
Whether you’re picking up your first camera or simply curious about the medium, these tips will give you a solid foundation to help you create beautiful, analog images..

Key Takeaways:
- Life gets easier once you understand the basics of the exposure triangle.
- The Sunny 16 rule will help you get shooting without metering for light.
- Metering for light will help you expose for high contrast and unstable conditions.
- Logging your shots will help you learn.
- Embrace mistakes – they’re how you can learn in the first place!
1 – Learn the Exposure Triangle
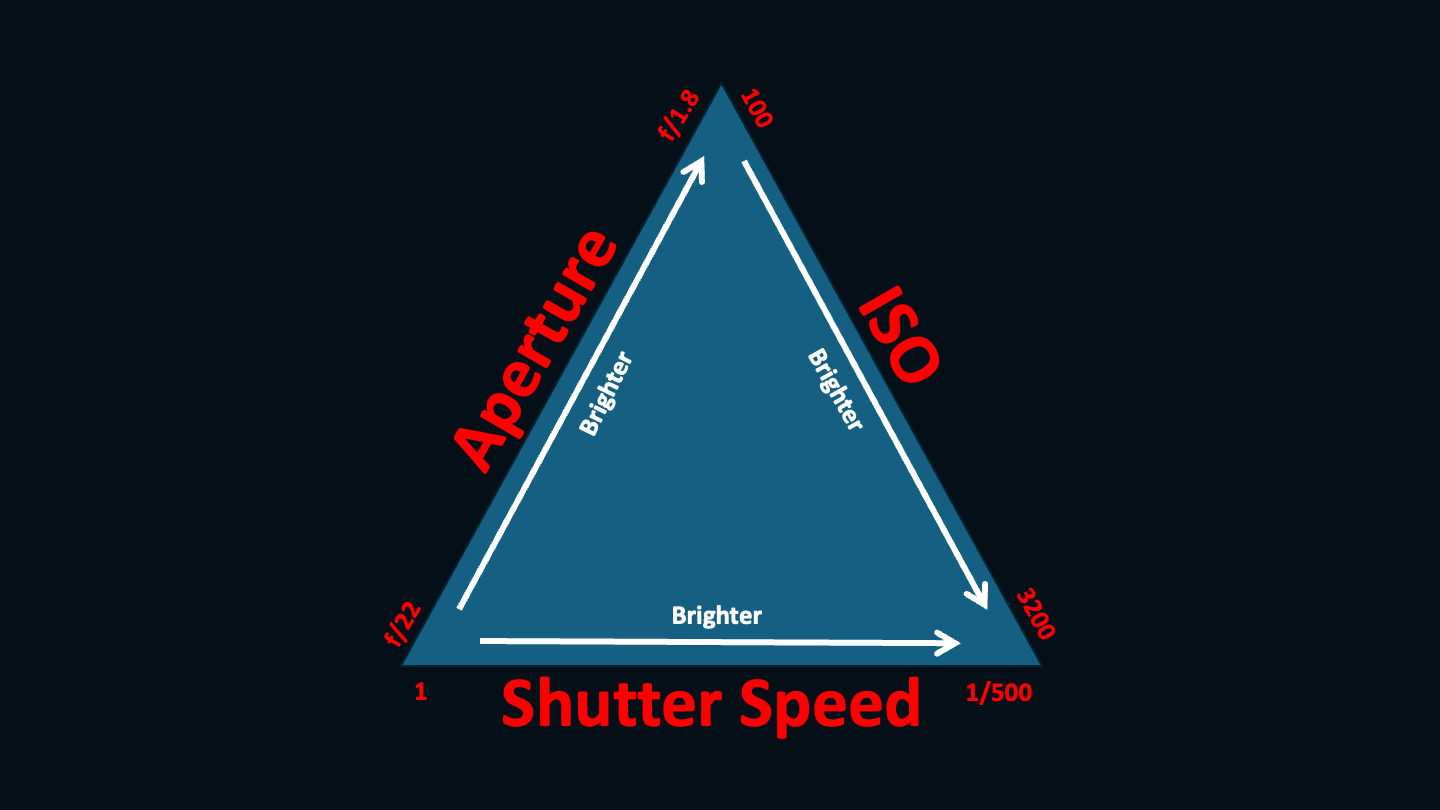
Film photography is a mad alchemy of chemicals and light – within this process, you have 3 main variables that underpin every photo you take: aperture, ISO and shutter speed. Together, these form the exposure triangle, a fundamental concept in both film and digital photography.
Understanding these three variables is essential for any aspiring photographer. By mastering the exposure triangle, you’ll not only feel more confident in your shooting but also gain the ability to make creative and informed decisions.
Put simply: aperture controls the depth of field, ISO affects your film’s sensitivity to light, and shutter speed dictates how long your film is exposed to light. The interplay between these three factors determines the final look of your image and, once wielded with confidence, can unlock your creative potential with a camera.
Mastering the exposure triangle will help you achieve better control over your shots and understand the ‘why’ behind your choices. If you want to break away from automatic shooting modes, use a fully manual film camera, and have more creative freedom, this knowledge is key.
I’ve written a full guide to the exposure triangle which you can read here – hopefully it breaks this down into something simple and digestible!
2 – Learn the Sunny 16 Rule
Once you’ve grasped the basics of the exposure triangle, it’s time to put that knowledge into practice with the ‘Sunny 16’ rule.
This is a tried-and-true method that helps photographers estimate correct exposure without relying on a light meter. It’s particularly useful if your camera’s light meter is broken (a common issue with vintage film cameras), or if you’re shooting without access to a digital light meter or app.
The Sunny 16 rule is also invaluable for fast-paced shooting, like street photography. When you’re moving quickly and trying to capture spontaneous moments, the last thing you want to do is fiddle around with your light meter and risk missing the shot.
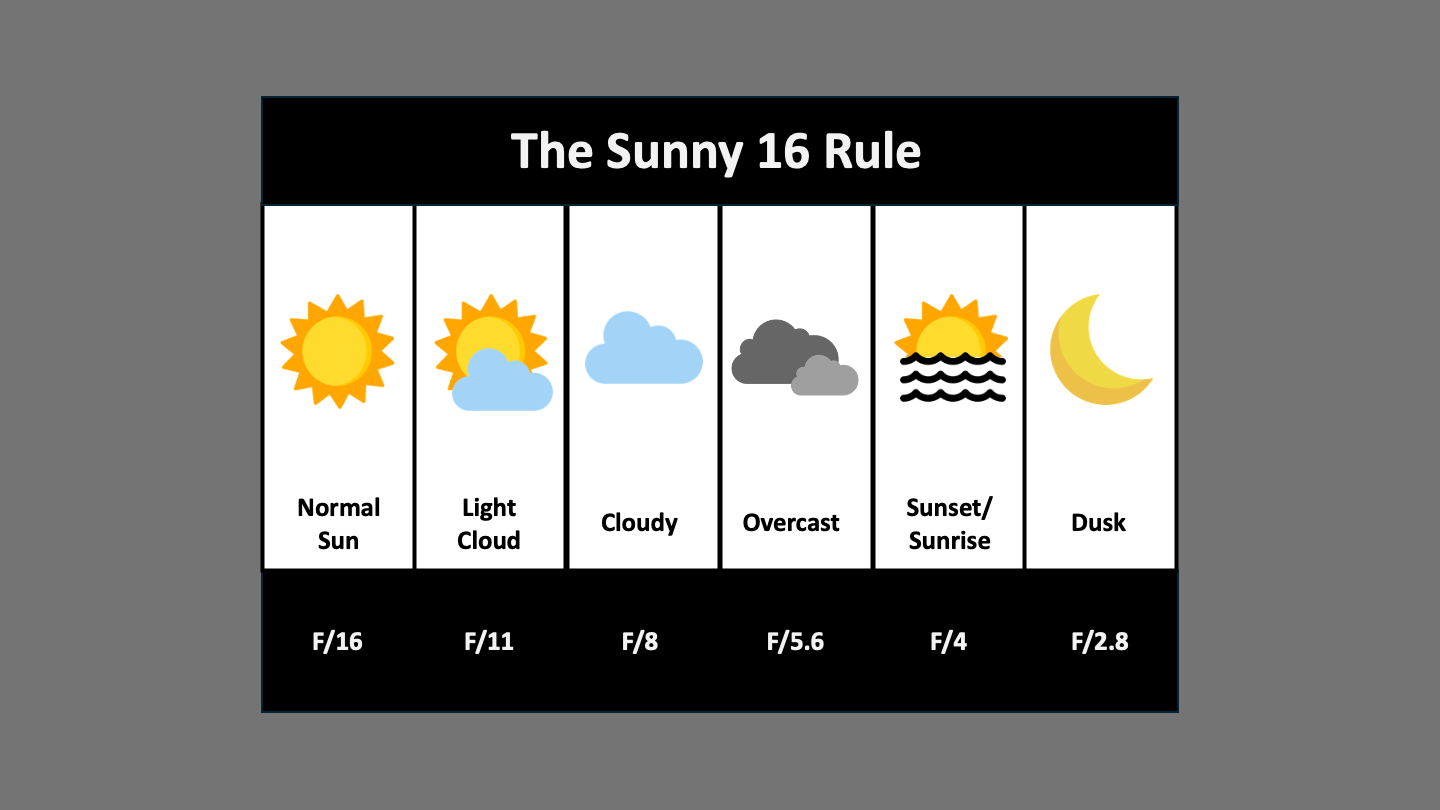
Here’s how the rule works: If you’re shooting in bright, sunny conditions, set your aperture to f/16 and your shutter speed to the reciprocal of your film’s ISO.
For example, if you’re shooting Kodak Gold 200 film, set your shutter speed to 1/200 or the closest equivalent your camera allows. If you can’t match the ISO exactly, err on the side of caution by choosing a slightly slower speed to avoid underexposure.
As lighting conditions change, you can adjust the aperture accordingly. For instance, if it becomes slightly cloudy, drop to f/11. In full overcast conditions, f/5.6 might be appropriate, and you could go as wide as f/4 at sunrise or sunset.
As someone who lives in the north of England, I think I get to use “sunny 16” about 6 days a year, and spend the rest of it between f/11 and f/5.6…
The Sunny 16 rule is a great way to build confidence in shooting without a light meter. Just remember that it works best in stable lighting conditions, and be mindful of shadows cast by buildings or other objects.
Also, don’t forget to log your exposure settings in your analogue book so you can reflect on what worked and what didn’t (see below!)
For a more in-depth explanation of the Sunny 16 rule, here’s my dedicated guide!
3 – Learn to Use an Analogue Book
One of the biggest differences between digital and film photography is the lack of instant feedback. With digital, every shot is accompanied by metadata: aperture, shutter speed, ISO, and more.
You can immediately review your settings and adjust or, when editing later, know what settings to use again down the line.
In film photography, however, once the shot is taken, none of that helpful metadata is saved.
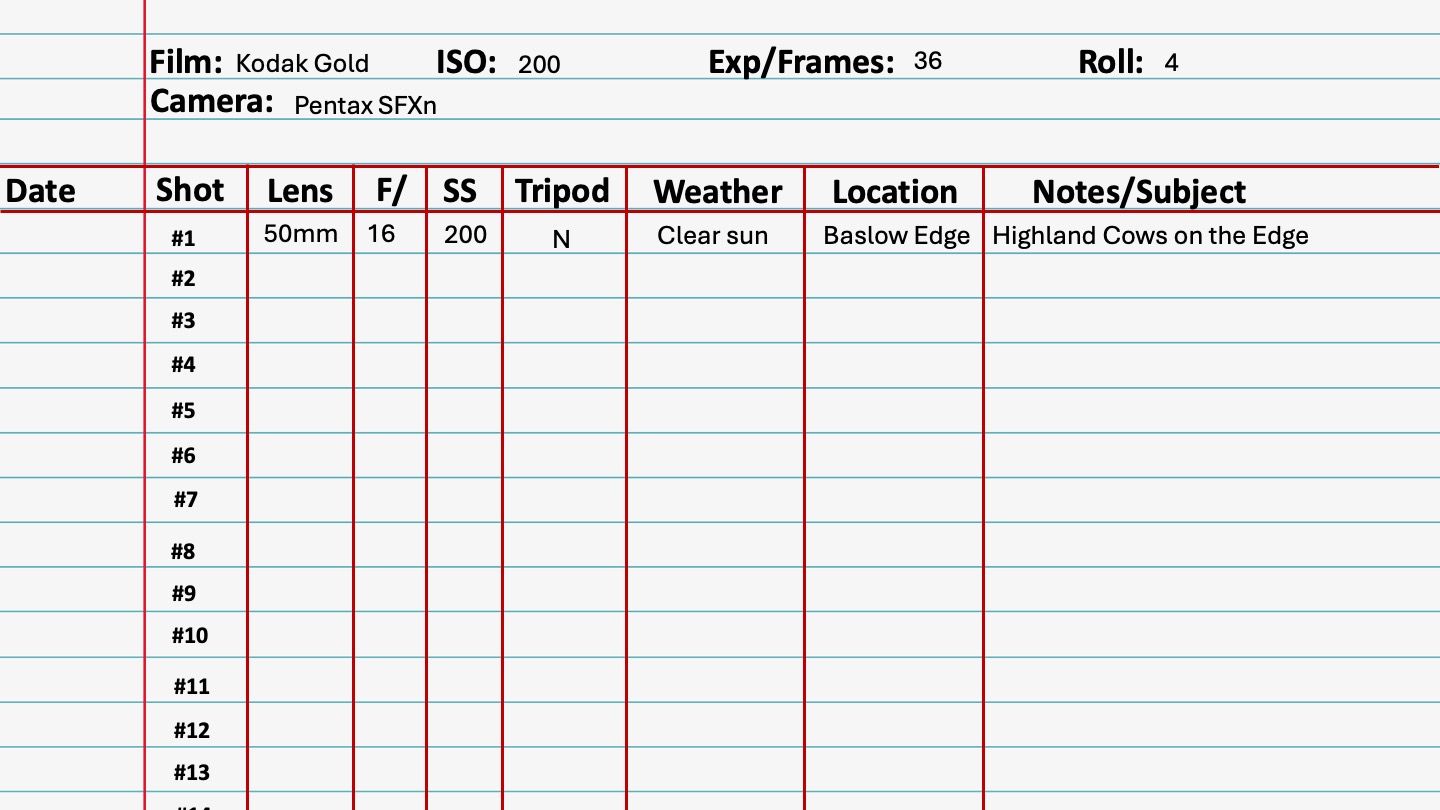
This is where an analogue book (or any method of recording your shooting details) becomes invaluable. You can use anything from a dedicated app to a simple notebook to log key information such as your camera settings, shooting conditions, and personal notes.
The key is consistency. Whenever you take a shot, jot down the following: film stock, camera model, date, time, location, shot number, lighting conditions, shutter speed, aperture, and any relevant notes.
By keeping track of this information, you can compare your log to the developed film and learn from your successes or mistakes.
I know this might sound tedious, but it’s actually a lovely thing to look back on and is absolutely vital if you’re wanting to progress your understanding and ability.
Personally, I love the tactile feel of using a pocket-sized notebook to record my notes while shooting. It’s always in my camera bag, ready for quick updates.
If you’d like to know more about this, here’s a dedicated guide to film photo metadata logging.
4 – Learn How to Use a Light Metering App
Light metering apps are a lifesaver when you’re shooting with a manual film camera that lacks a built-in light meter or has a faulty one.
These apps help you calculate the correct exposure settings for any given lighting condition, giving you the ability to shoot more confidently.
There are many free and paid light metering apps available for both iOS and Android. Some popular examples include “myLightMeter” and “Light Meter – lite.”
My personal favourite is “Lghtmtr” – it’s free and ridiculously simple. Being able to tap and view/adjust the type of exposure I am after is so useful!
These apps allow you to input certain parameters, like your desired aperture or shutter speed, and will suggest the other necessary settings to achieve a proper exposure.
A key tip when using a light meter app is to decide which variable is most important for your shot. For example, if you’re taking a portrait and want a shallow depth of field, you’ll want to prioritise aperture.
Once you lock in your desired f-stop, the app will calculate the correct shutter speed and ISO to match. This is where the exposure triangle comes into play – understanding how these elements interact will make your use of the app even more effective.
5 – Accept Failure and Mistakes
Film photography is a learning process, and mistakes are inevitable. But don’t be disheartened! Every overexposed frame, every blurry shot, every roll of film that didn’t quite turn out how you imagined is an opportunity to learn and grow as a photographer.
The beauty of film photography lies not only in its results but also in the journey. Some of the most beautiful images can come from what you might initially consider a “mistake.” For instance, light leaks, unexpected grain, or even slight underexposures can add character and mood to a photo that would be impossible to replicate digitally.
The key is to embrace these moments as part of your development. Use your analogue book to document your process and analyse where things went wrong and why. Over time, this reflective practice will make you a better, more intuitive photographer. In the end, it’s all about learning from those experiences and allowing yourself the freedom to experiment.

Get out and shoot your shot!
Film photography is a rewarding but sometimes challenging journey, filled with nuances that take time to master. Please stick with it – I promise it’s worth it in the end.
Remember, each shot is a learning experience, and the beauty of film is in its unpredictability. Keep shooting, keep learning, and most importantly, have fun with your camera. Ultimately, that’s all that matters.